Wednesday, October 24, 2012

DIY - Gold Tube Bracelet (Pt. 2)

Hi Everyone,

Here is Part 2 of the DIY Gold Necklace and Bracelet set! 

If you just stumbled up this DIY post check out the DIY Necklace Post ! These two are a set and perfect for gift giving just like our featured designer Kristine showed us in the last post, I love her rad wrapping ideas for these pretty little gems! 

Thanks again Kristine for being such an awesome contributor to Little Woodland Friend, we are so looking forward to featuring your graphic design and invite work!


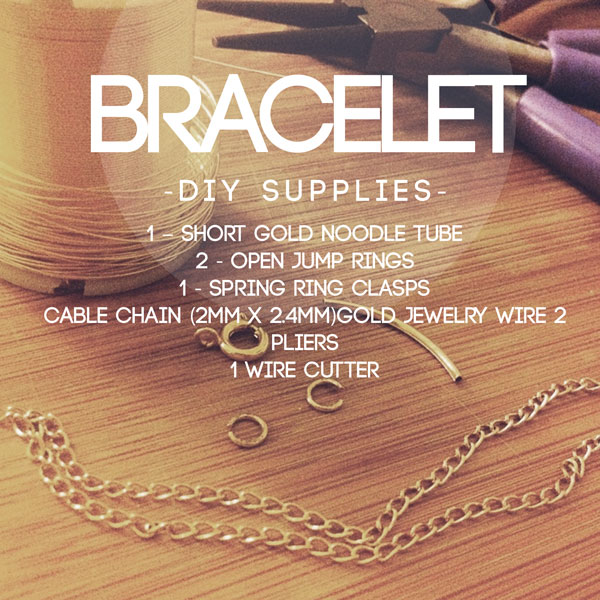
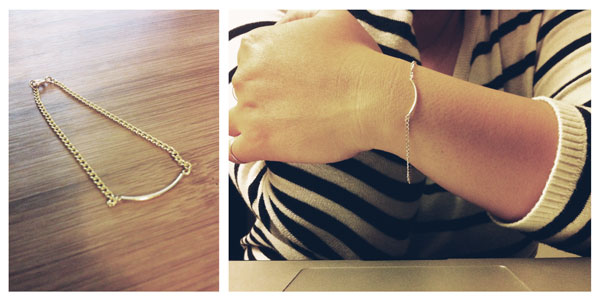
Step 1. Begin by measuring the desired length of your chain. I measured my bracelets to be 5.5”-6” inches long.    


Step 2. Cut the chain in half.  


 Step 3. Cut a piece of beading wire. You want it long enough to easily handle. I cut mine to be about 6”-7” long.


Step 4. Loop one end of the wire through one end of the chain and twist the wires a few times to tighten the hold on the chain. Then feed both ends of the wire through the gold noodle tube. Once you’ve fed the wire through, loop one end of the wire to the other length of chain and gently twist the wires shut. Cut off excess wires. You want this to look nice and neat, so twist it just a few times and trim as close to the end as possible to blend it seamlessly with the chain. 


Step 5. With your pliers in either hand, gently pry open one of the jump rings. Hoop the spring clasp and one end of the chain to the jump ring, then gently close the jump ring to complete your perfect circle again. 


Step 6. Again, using your pliers, gently open the second jump ring and hoop the other end
 of the chain to the ring. Close the jump ring to complete a perfect circle. 


That’s it! In just a few steps you can have your own gold bar jewelry! It’s seriously the world’s easiest D.I.Y. necklace and bracelet. 


If you prefer to purchase this set feel free to contact Kristine via e-mail : 
kristine@red-letter-stationery.com


Here are a few links to find the supplies featured in this DIY post:

Wire 

Monday, October 22, 2012

DIY - Gold Tube Necklace (Pt.1)

Hi Everyone, I'm so excited to debut our first DIY project submitted by a very talented graphic designer, Kristine Lacanlale, who will be featured sometime in the coming weeks! Kristine was so kind to let us see how she made these wonderful pieces. Stay tuned because tomorrow I will be posting a DIY on a matching bracelet! 


...

After arriving home from a summer abroad in England, I wanted to give gifts to my closest friends as a way to thank them for their support. I could have easily bought something, but I wanted it to be special, handmade and chic. So when I saw similar looks of this bracelet and necklace on Pinterest, I just had to make it. This delicate gold bar necklace and bracelet is the perfect addition to any outfit and I’ve already made it my go-to piece for my favorite season—Autumn! Here’s the how-to so you can make it for yourself and your closest friends! 


Step 1. Begin by measuring the desired length of your chain. I measured my necklaces to be 18” long.


Step 2. With your pliers in either hand, gently pry open one of the jump rings. Hoop the spring clasp and one end of the chain to the jump ring, then gently close the jump ring to complete your perfect circle again.   


Step 3. Slide your gold noodle tube through the chain.


Step 4. Again, using your pliers, gently open the second jump ring and hoop the other end of the chain to the ring. Close the jump ring to complete a perfect circle.


And if you’re giving them out as gifts, why not make your own packaging right? With torn book pages, glue, a needle, some thread and a little bit of imagination, I made these cute packaging to hold my jewelry. You can easily use wrapping paper, newspaper, and maybe even some fabric if you sew the seams in to avoid it from fraying. Now, go get creative! It’ll make the world a happier place. If you have any questions or would like to place an order, shoot me a line at kristine@red-letter-stationery.com! I’d love to hear from you!


Here are a few links to find the supplies featured in this DIY post:


Wire 
Pliers/Wire Cutter Tool Set

Also, Kristine captured these Photographs by iPhone 4 Edited with VSCO Cam iPhone App

-Little Woodland Friend


Sunday, October 14, 2012

Kelli Murray - An Artist Interview & Look Book

Hi Everyone,

So excited to get you pumped this Monday morning by this amazing illustrator, painter, blogger, fashion inspiration, designer, and pretty much everything we here at Inspiration Den adore! 


I first stumbled upon Kelli's work on Pinterest. Everyone at Inspiration Den has a special place our hearts for paper & illustration, and this artist just blew our minds... It was her
LET'S CELEBRATE invitation which caught our attention. I loved this invite so much I needed see more. I was totally inspired by her blog, and found out that Kelli was not only a talented designer, but that she also has a knack for fashion and a super cute daughter! 

So, without further ado, I would like to introduce you to Kelli Murray...


LWF: How would you describe your art in 10 words?

KM: Oh, this is terribly hard.  I would say my art is endearing, sweet and sometimes heart provoking.  Usually composed of dreamy girls and/or their animal friends.  (and that was over ten words!)  

 LWF: What inspires you and how do you start the creative process?  

KM: I am inspired by so many things.  Mainly nature and fashion and people.  I love to draw little animals and have really taken to illustrating female portraits.  All of my artwork starts with just a quick sketch of something I am inspired by.  I try to have a notebook with me all the time for this reason!  Weather it's something I saw in a book or online...or something in my own life.  Lately, I have been really enjoying using pencil and watercolor on paper.  But most of my work is done on wood panels using acrylic paint.    

LWF: Do you have any words of wisdom or encouragement for artists who are just honing their craft?  

KM: Just keep creating.  Defining your style as an artist does not come overnight.  In fact, I think it's a journey that never ends. But just like anything, the more you practice, the better you will get.  Just don't give up.

LWF: I see you're the head designer for Jedediah Clothing Company... Can you tell us a little bit about it?  

KM: I actually am in desperate need of a website update, so my current bio is a bit misleading.  I worked for Jedidiah for 6 years as the head designer, but decided to go full time freelance when I had my daughter in August of last year.  When I was working full time for them, my main roles were in graphic design and merchandising, and I worked with a team of other talented designers to create a full product line each season.  It was an amazing job and there are parts of it I do miss....but going freelance has allowed me to be at home with my daughter and also dive more deeply into my personal art and illustration.  Which is really my passion.


Contact Information & Shop for Kelli Murray